Pilotage information
Access downloadable ECDIS Files and Waypoints for the Deep Draft Channels
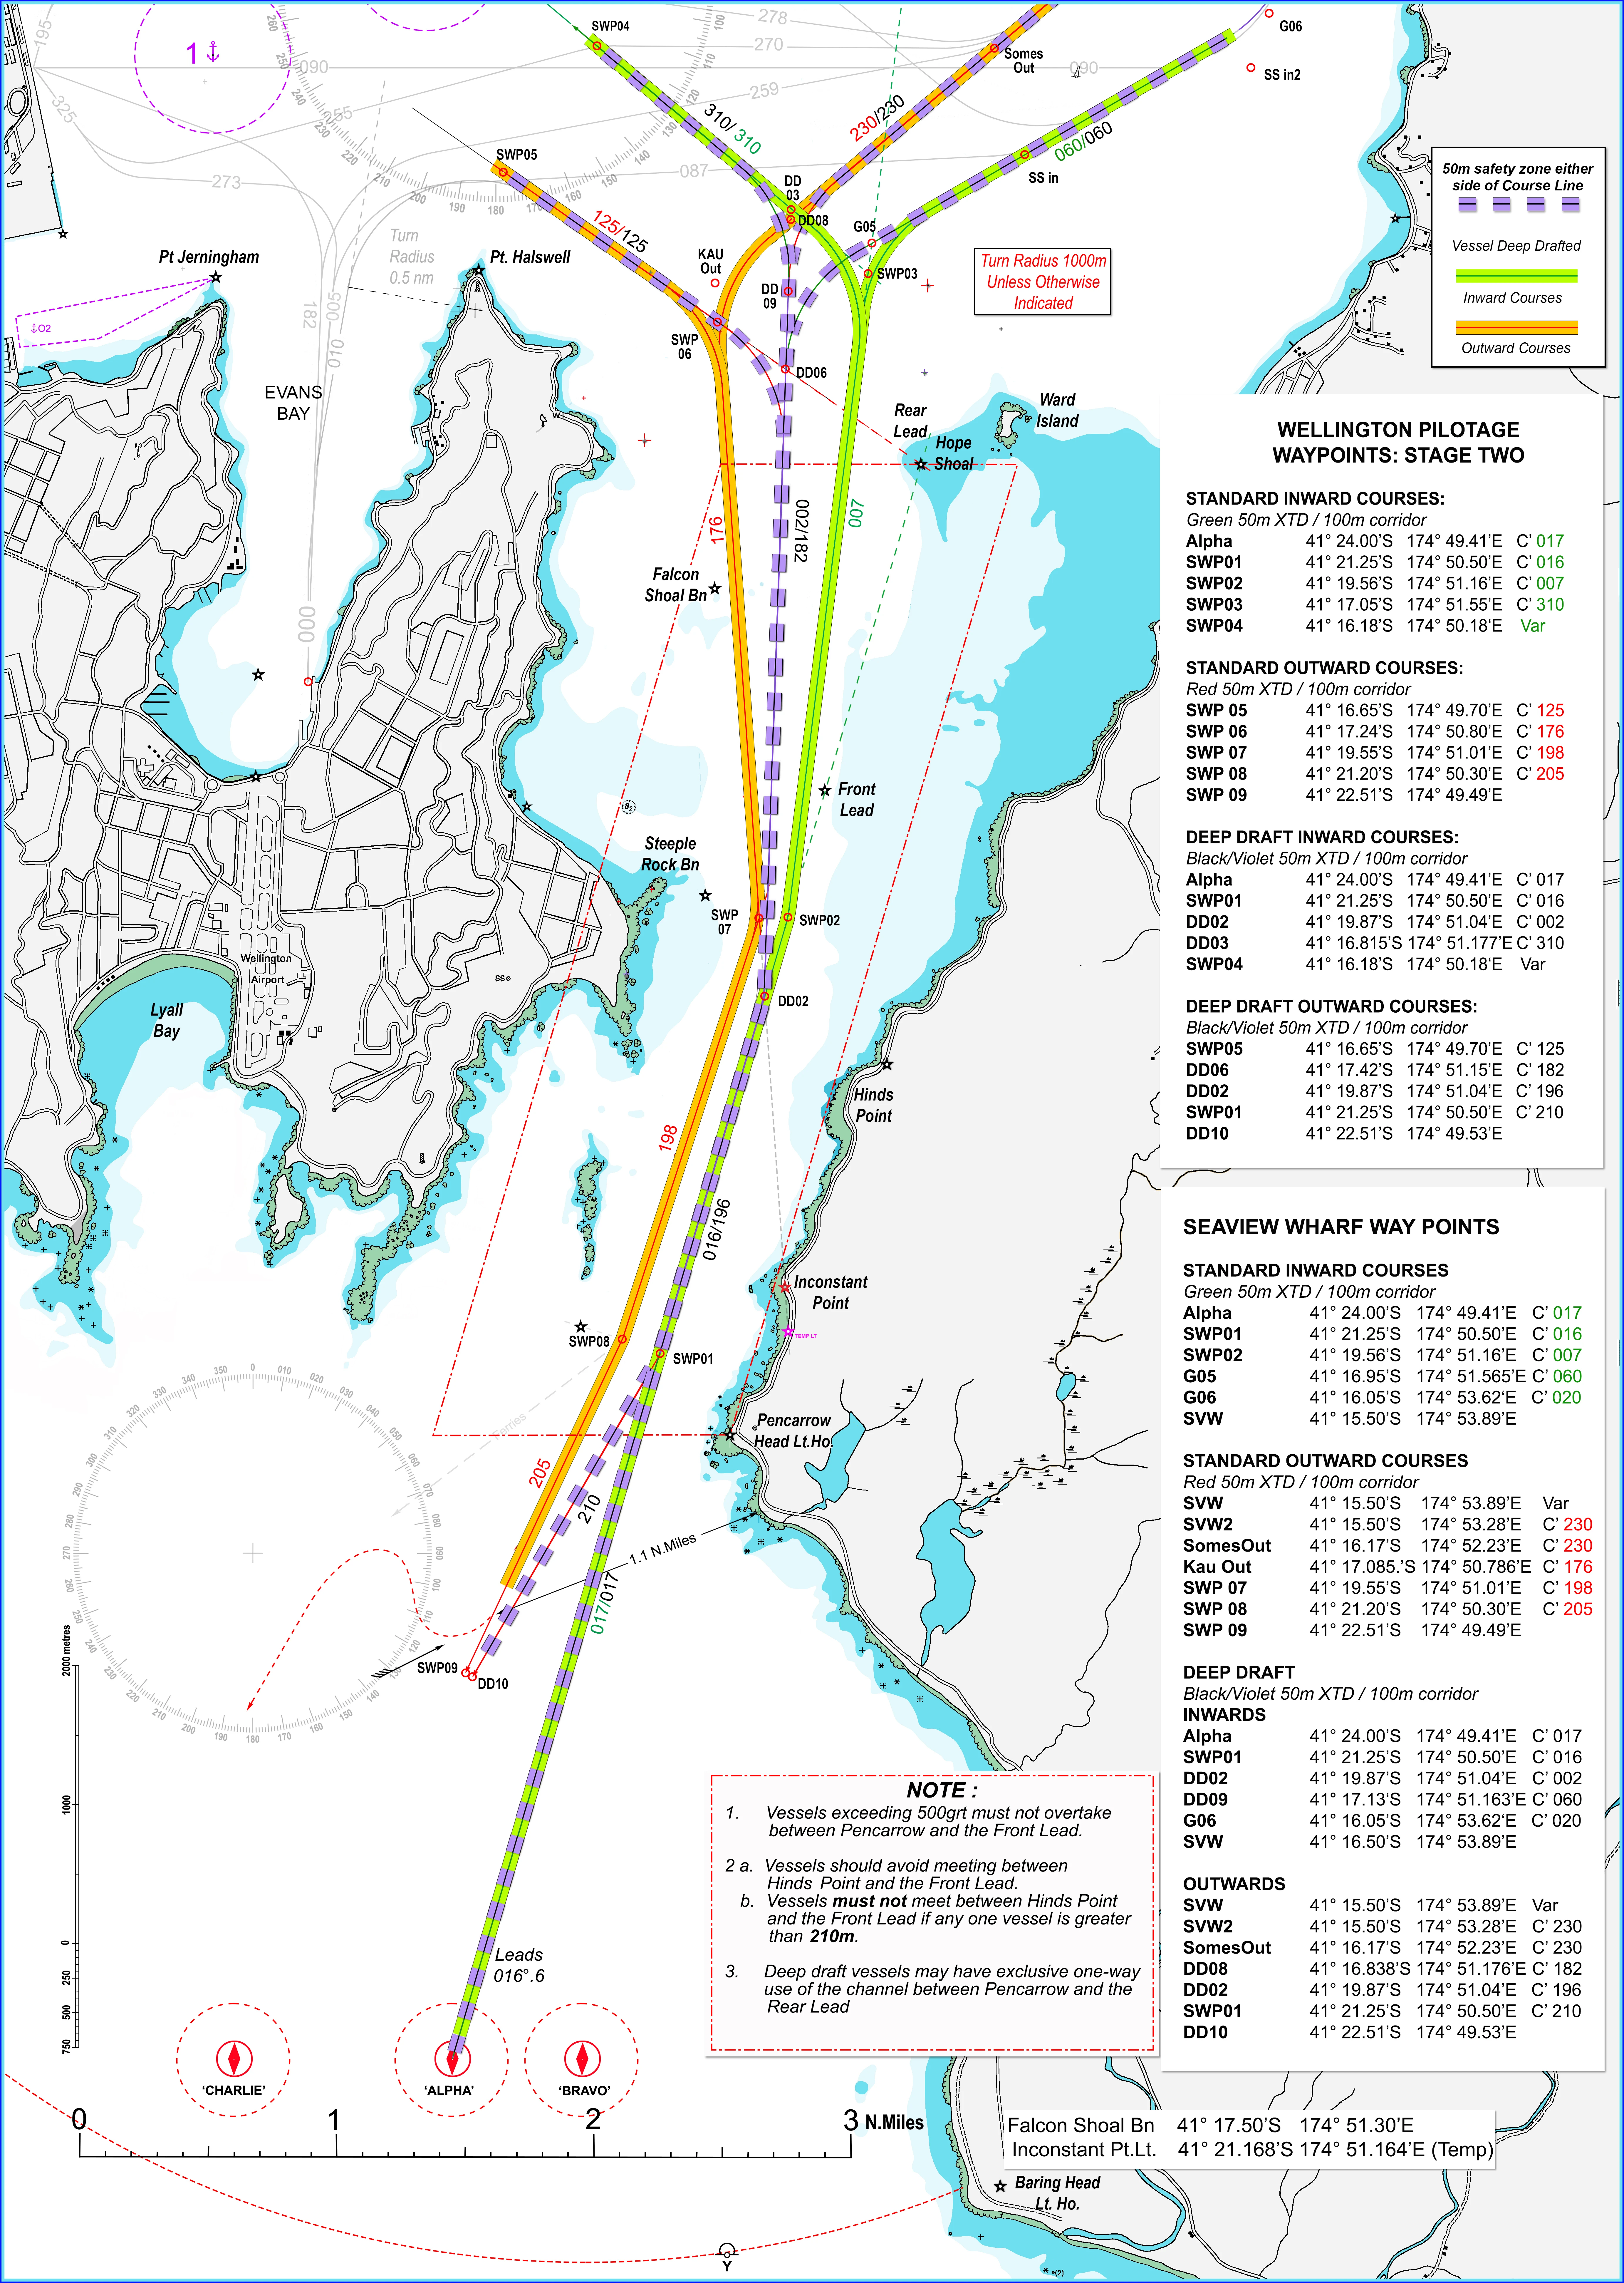
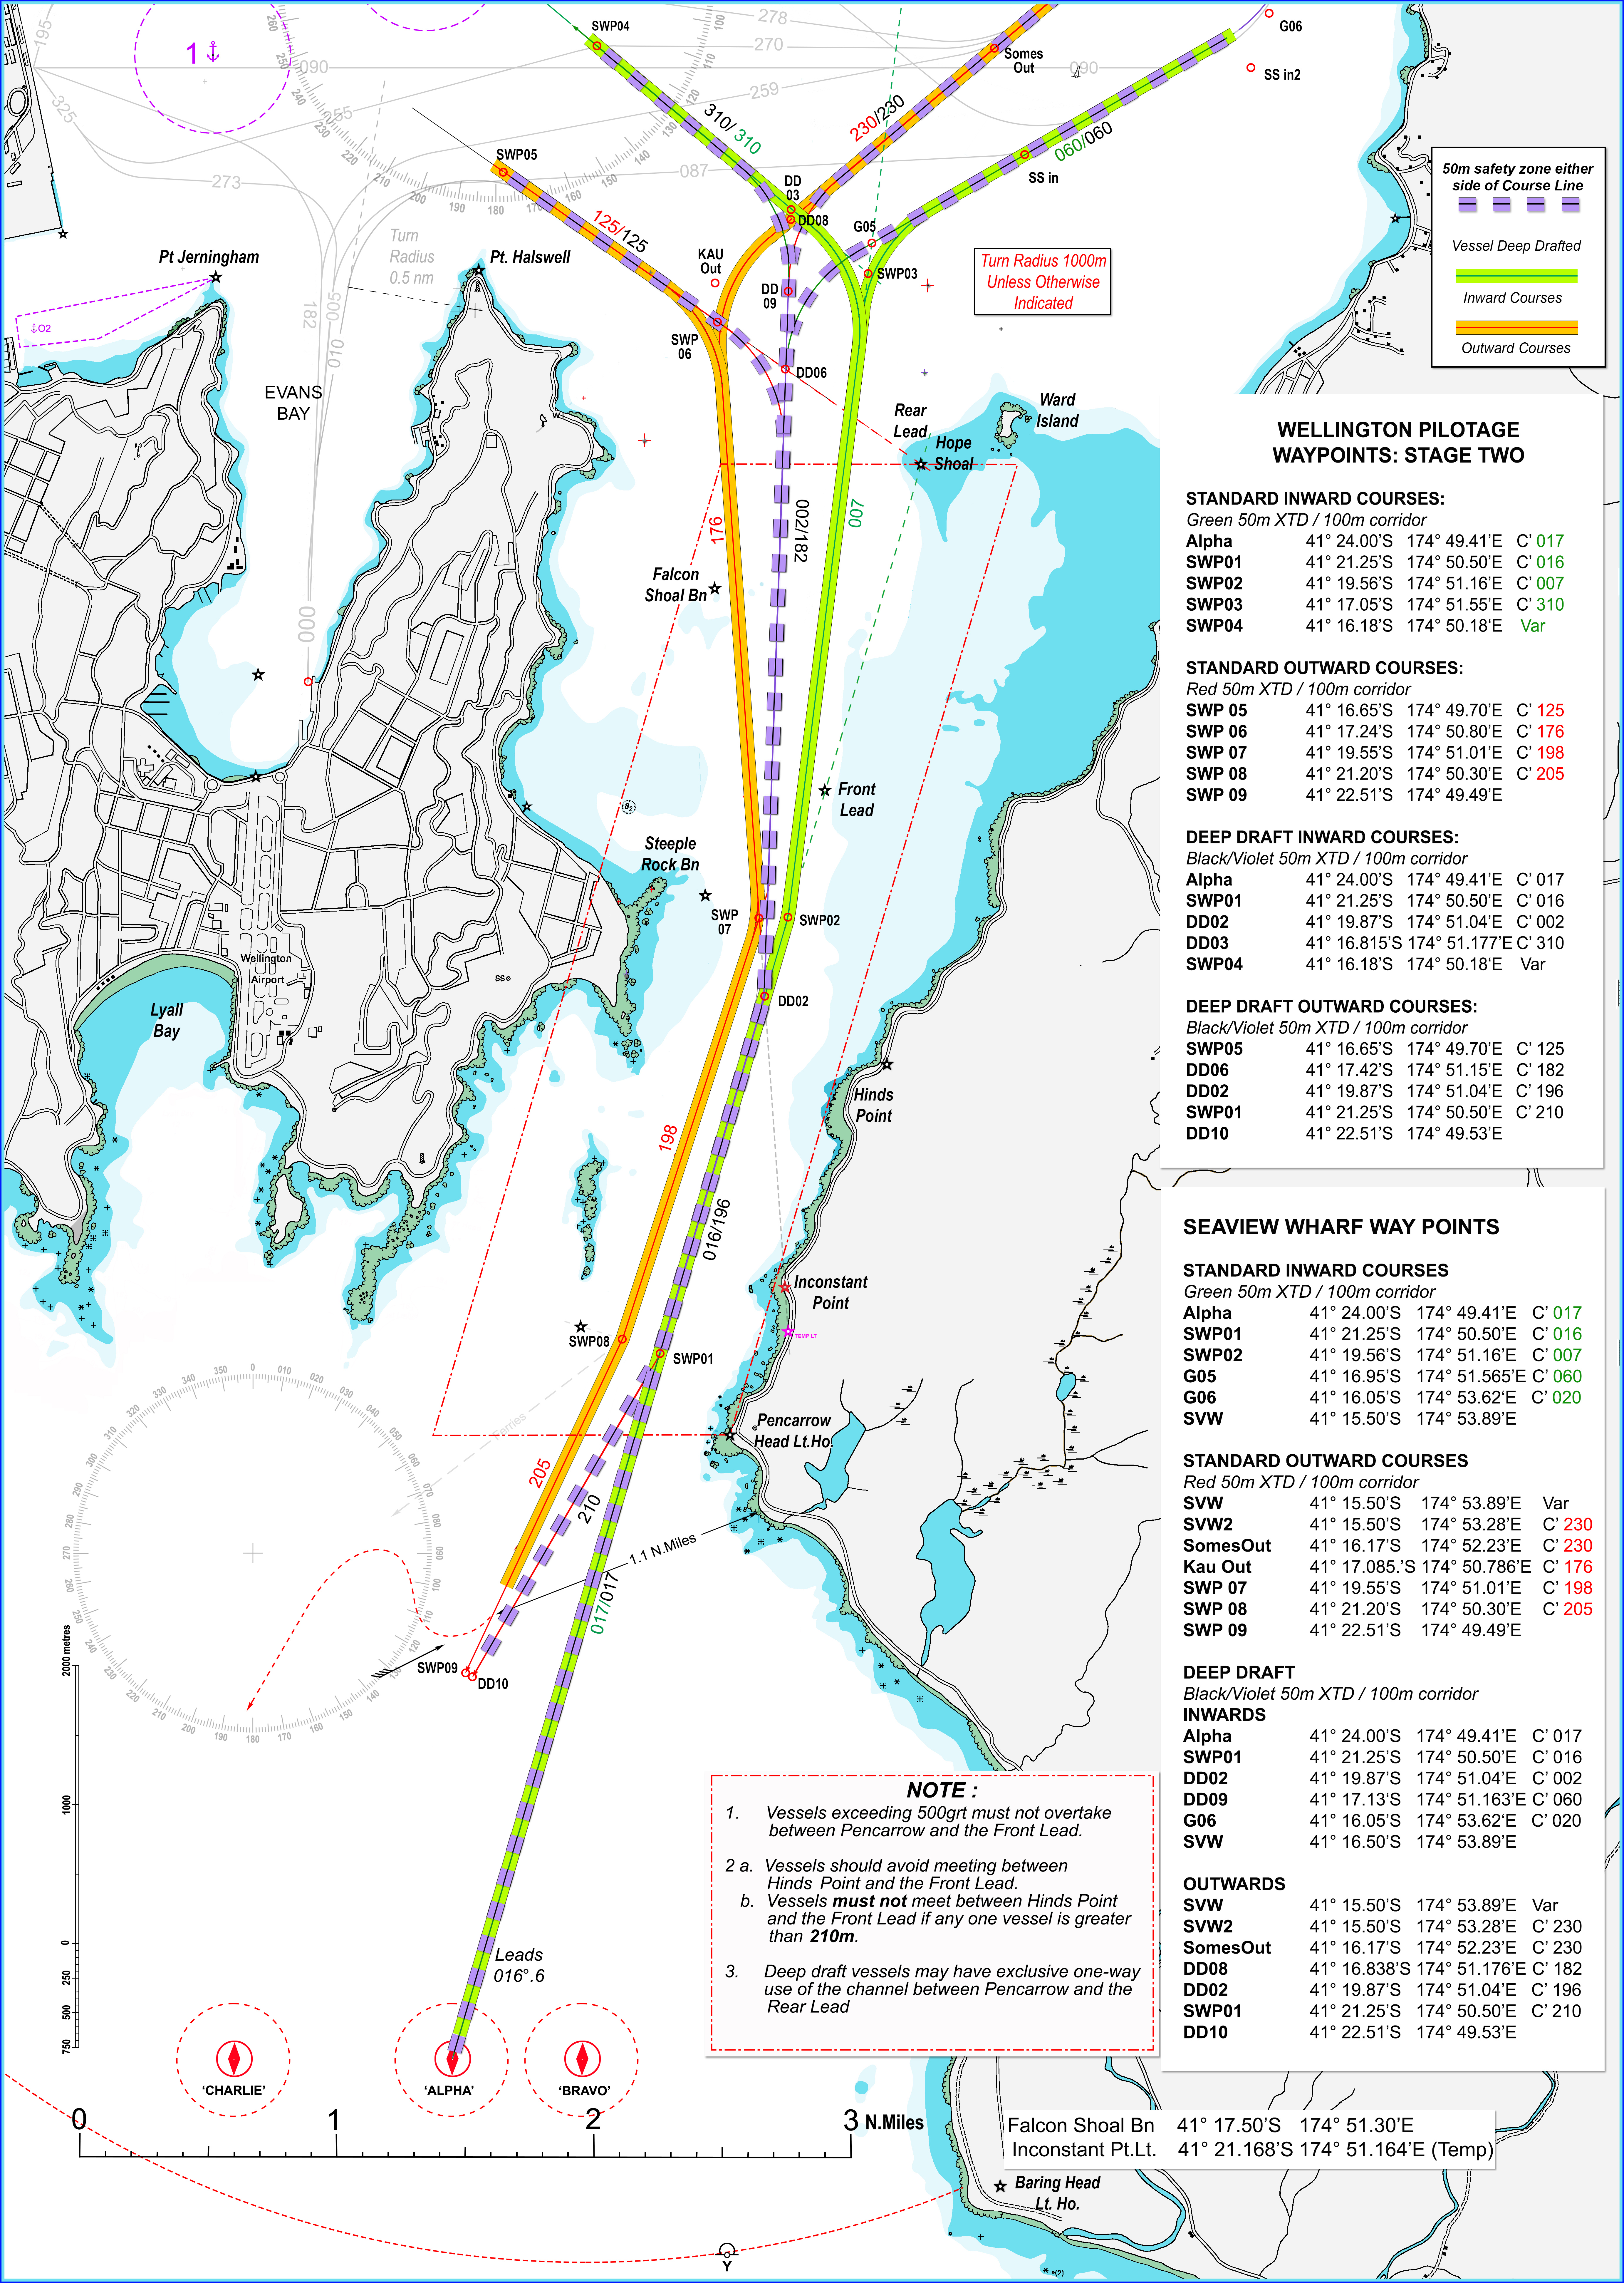
Passage Waypoints for the Wellington Channel
Wellington Pilotage Waypoints
Standard Inward Courses
Green 50m XTD / 100m corridor
|
Waypoint |
Latitude |
Longitude |
Course |
|
Alpha |
41° 24.00’S |
174° 49.41’E |
C’ 017 |
|
SWP01 |
41° 21.25’S |
174° 50.50’E |
C’ 016 |
|
SWP02 |
41° 19.56’S |
174° 51.16’E |
C’ 007 |
|
SWP03 |
41° 17.05’S |
174° 51.55’E |
C’ 310 |
|
SWP04 |
41° 16.18’S |
174° 50.18’E |
Var |
Standard Outward Courses
Red 50m XTD / 100m corridor
|
Waypoint |
Latitude |
Longitude |
Course |
|
SWP 05 |
41° 16.65’S |
174° 49.70’E |
C’ 125 |
|
SWP 06 |
41° 17.24’S |
174° 50.80’E |
C’ 176 |
|
SWP 07 |
41° 19.55’S |
174° 51.01’E |
C’ 198 |
|
SWP 08 |
41° 21.20’S |
174° 50.30’E |
C’ 205 |
|
SWP 09 |
41° 22.51’S |
174° 49.49’E |
Seaview Wharf Waypoints
Standard Inward Courses
Green 50m XTD / 100m corridor
|
Waypoint |
Latitude |
Longitude |
Course |
|
Alpha |
41° 24.00’S |
174° 49.41’E |
C’ 017 |
|
SWP01 |
41° 21.25’S |
174° 50.50’E |
C’ 016 |
|
SWP02 |
41° 19.56’S |
174° 51.16’E |
C’ 007 |
|
G05 |
41° 16.95’S |
174° 51.565’E |
C’ 060 |
|
G06 |
41° 16.05’S |
174° 53.62’E |
C’ 020 |
|
SVW |
41° 15.50’S |
174° 53.89’E |
Standard Outward Courses
Red 50m XTD / 100m corridor
|
Waypoint |
Latitude |
Longitude |
Course |
|
SVW |
41° 15.50’S |
174° 53.89’E |
Var |
|
SVW2 |
41° 15.50’S |
174° 53.28’E |
C’ 230 |
|
Somes Out |
41° 16.17’S |
174° 52.23’E |
C’ 230 |
|
Kau Out |
41° 17.085’S |
174° 50.786’E |
C’ 176 |
|
SWP 07 |
41° 19.55’S |
174° 51.01’E |
C’ 198 |
|
SWP 08 |
41° 21.20’S |
174° 50.30’E |
C’ 205 |
|
SWP 09 |
41° 22.51’S |
174° 49.49’E |
Passage Waypoints Chart
Download the waypoints chart
Pilot Stations
Pilot stations |
|||
| “A” | 41 24.00’ S 174 49.43’ E | steer 016.5 | Pilot Station “Alpha” |
| “B” | 41 24.00’ S 174 50.10’ E | Pilot Station “Bravo” | |
| “C” | 41 24.00’ S 174 48.30’ E | Pilot Station “Charlie” | |
Port passage planning
The information below can help you plan your arrival and departure from Wellington Harbour.
Charts
The charts used for Wellington are:
- NZ 463 Approaches to Wellington
- NZ 4633 Wellington Harbour
- NZ 4634 Wellington Harbour entrance and plans of wharves
Four pilot boarding areas have been established at the following approximate positions:
'A' Alpha 41°24.00’ S 174 49.43’ E Steer 016.5
'B' Bravo 41°24.00’ S 174 50.10’ E
'C' Charlie 41°24.00’ S 174 48.30’ E
Pilots will normally board from ‘Tarakena’, a 14.6 metre Striker launch capable of 14 knots or ‘Te Haa’ an 18 metre Camarc launch capable of 26 knots. A boarding speed of approximately 9 knots is preferred but this will depend on the sea and swell conditions.
The Pilot will arrange and describe a boarding position if this should differ from the charted positions (NZ 4633). The boarding position should allow time for the Pilot to present his pilotage plan to the bridge team. Ship’s bridge teams should have the pilot card ready for presentation.
This situation will be discussed with the Master by radio and a piloting plan agreed. The boarding position and the point of commencing the lead will be advised by the Pilot.
In the above conditions, the vessel should join the leads at least 3 miles from the entrance and the Master should carefully monitor the vessel’s progress during the passage, keeping strictly to the line of the leads.